Soda Bread, Better than Ever

SodaBread_1

I think soda bread is my favourite from-scratch bread. It has a tender but firm crumb, and can go savory or sweet: It’s there where, when, and how you need it. Served with butter and jam, it even makes for a lovely rustic dessert.

SodaBread_14

And it’s just plain fun to make; I like to think I am carrying on the tradition of Irish housewives when I make this. It seems like fewer and fewer people bother to make their own bread anymore, and I wonder if breadmaking and pastry chef-ing in general are truly on their way to becoming lost arts. When Sandra Lee is a viable TV “chef,” society has reached the stage of needing professional help. But I digress. 🙂

SodaBread_15

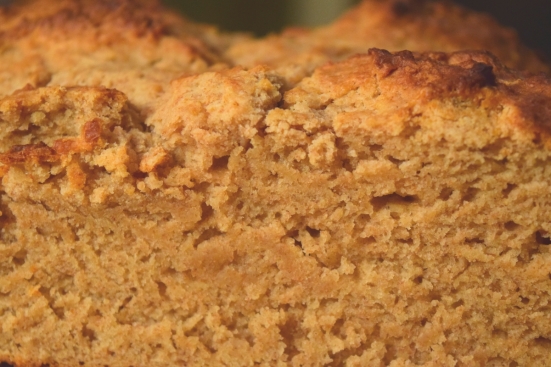
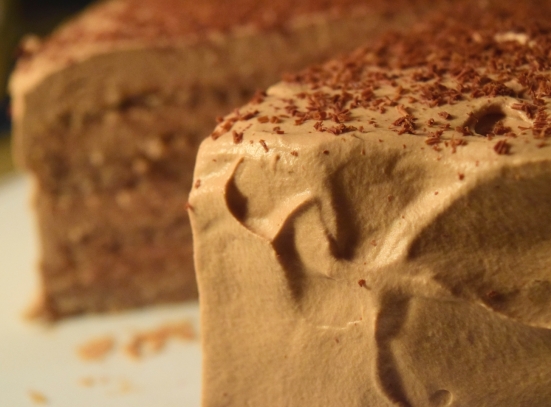
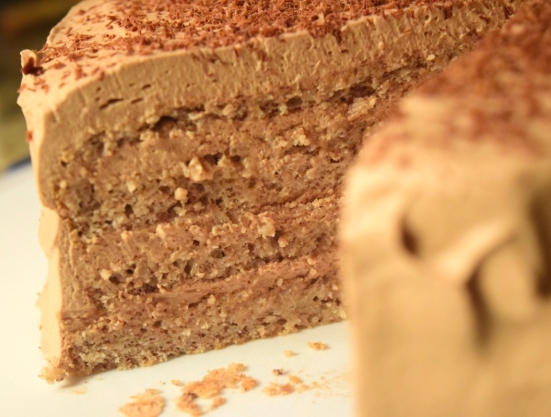
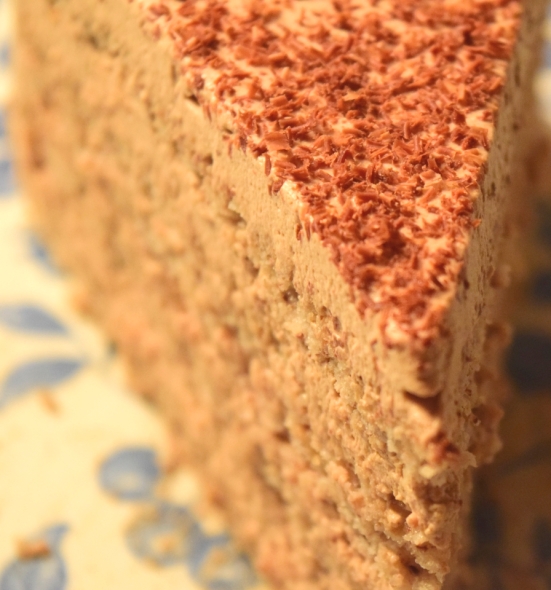
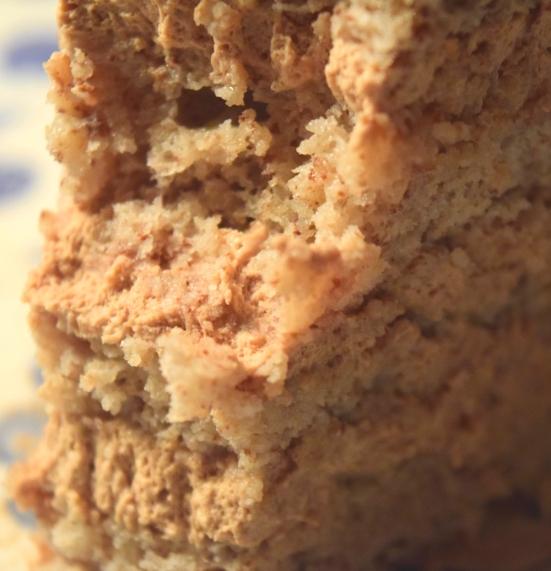
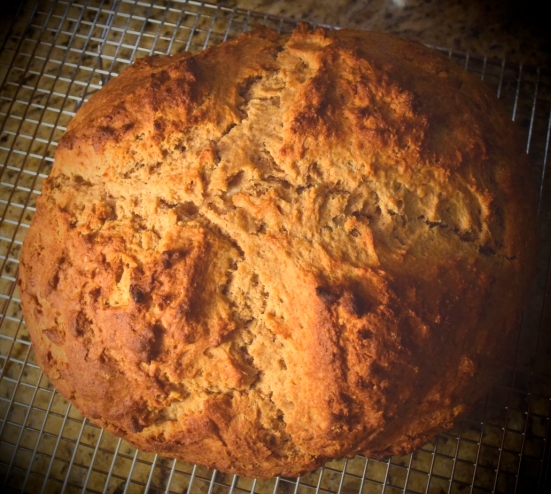
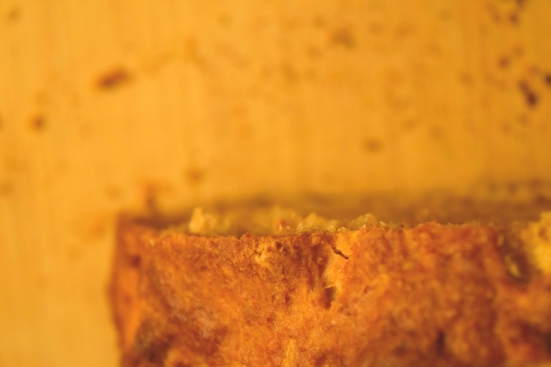
I recently made soda bread again for the first time in a long while, using Mrs O’Callaghan’s recipe. As I read through the recipe, I thought it sounded clumsy, and so I set out to make it better. The measurements I give in the original recipe are vague – in volume rather than weight. I wanted a more precise recipe, so I looked up what the average weight of each kind of flour is per cup, and I used those weights in my revamp of this recipe. Next, I took out the flax seed entirely, as I had added it in the deluded belief that flax seed makes bread healthy. It doesn’t. Carbs are carbs; carbs with flax seed added are simply carbs with flax seed added (which itself has carbs). Then I increased the amount of butter by nearly double, and I changed the kneading methodology to get the tender, moist crumb you see in the photo above. Instead of simply cutting in all of the butter, I cut in the first half of the butter, then fraisaged in the remaining butter with the heel of my hand as if I were making puff pastry. This left larger chunks of butter in the batter along with the finer pea-sized crumbs that result from cutting in butter with a pastry cutter, and it coated more of the flour in butter, which retards the formation of gluten and makes for a lighter, more tender crumb. Finally, I baked the bread in a cast-iron skillet, having been inspired by skillet chocolate chip cookie recipes. I got exactly what I wanted: a really fabulous soda bread recipe that bakes more evenly, offers a moister, more toothsome crumb, and has a richer flavour thanks to the addition of more butter and slightly more buttermilk. I hope you enjoy it. 🙂


SodaBread_12

Soda Bread

Yield: One 8″ round loaf

Ingredients:
384 g. whole wheat flour
330 g. all-purpose flour
60 g. cake flour
1 generous tsp. baking soda
generous 1/2 c. light brown sugar
1 tsp. Kosher salt
1 stick + 74 g. unsalted butter, cut into 1/2″ pieces and divided (this recipe turns out fine if you use 2 whole sticks of butter)
2 c. buttermilk, plus up to an additional 1/3 c. as needed to correct dough’s consistency

Method:
Preheat oven to 425°F.

Stir together dry ingredients in large bowl (8 quarts is ideal for this). Cut in brown sugar until no lumps remain. Cut in 1 stick of butter until butter is in small pieces. Press remaining 74 g. of butter into dough with your hands, leaving the butter in larger pieces this time. Stir in buttermilk. Dough should form a shaggy but cohesive ball; add more buttermilk as needed to reach this consistency.

Form dough into a 7″ round in a 9″ or larger cast iron skillet. Using a sharp knife, cut a deep cross in the center of the bread to let the faeries out. Wet fingers with water and smooth any jagged peaks on surface of bread. Bake until bread is golden brown but not burned, and the bottom is a deep golden brown; this takes about 40 minutes.

Cool bread on wire rack for about 30 minutes. Slice while still warm. Wrap tightly in cling film and store at room temperature. Bread starts to go stale after about 2 days.

Source: Heavily adapted from Mrs O’Callaghan’s Soda Bread

Grated Bread & Chocolate Cake

GratedChocolateCake_6

When it comes to unusual cakes, this one takes the… well. I guess you could say it takes itself! 😉

GratedChocolateCake_7

The texture of this cake is decidedly European. Its structure comes from a blend of ground nuts and beaten egg whites – so, nuts and air. 🙂 This kind of cake is common in Europe, especially in older European recipes, but it is rarely seen in American cake recipes. The crumb is not as sweet as American palates are accustomed to; it is a subtle blend of almond and chocolate, owing to the inclusion of grated semisweet chocolate in the batter. Heightening the complexity of the cake’s flavour is the addition of Merlot. It’s mild-tasting only if you are used to the in-your-face sugary concoctions that define America; it’s stunning if your palate is more open to finessed flavours. The cake is filled and iced with a semisweet chocolate mousse which pairs perfectly with this cake, teasing out the mild chocolate flavour inherent within the crumb. I further enhanced the chocolate flavour by brushing the cake with a mocha raspberry simple syrup. Not only does this further moisten the cake’s soft crumb, it adds yet another subtle layer of flavour.

GratedChocolateCake_3

This sophisticated cake won the $25,000 grand prize of a heritage recipe contest held by America’s Test Kitchen. According to the recipe’s author, the cake was apparently borne of the desire not to waste bread! Indeed, the cake does include grated bread crumbs. I read the list of ingredients and almost didn’t bother making this cake, as it sounded weird. I’m so glad I took a chance and tried this cake out. It really stands out in a sea of oversweetened, one-note desserts. (My taste buds really woke up when I stopped eating sugar every single day!) I’m fairly certain that most people reading the recipe have the same reaction I did; a combination of “Bread crumbs? Huh?” and “That sounds like it would turn out kind of dry.”

GratedChocolateCake_17

Surprisingly, the cake does not come out dry, even without the application of simple syrup. It is reminiscent of an angel food cake. The simple syrup gives it the kind of moisture we associate with devil’s food cake, and that legendary texture coupled with the cake’s intriguing complexity of flavour makes it something unforgettable.

Despite the inclusion of 9 egg whites, the finished cake does not taste eggy. It tastes of chocolate, coffee, and mild sweetness. I urge you to try this, even though it probably sounds a bit odd to you, as it did to me. It’s a taste of Old World Europe, just waiting for you at the edge of a microplane zester. 😉

GratedChocolateCake_1


Grated Bread & Chocolate Cake

Yield: One 9″, two-layered cake

Ingredients:

For the cake:
9 oz. (2 c.) almond flour
1/2 c. plain dried bread crumbs
2 TBS all-purpose flour
1 oz. semisweet chocolate (I used 70% Lindt), grated finely (I used a Microplane zester)
1 tsp. baking powder
9 large egg whites
1/2 tsp. cream of tartar, optional (use if your eggs are old, or if you aren’t sure how old they are; older egg whites simply won’t beat up as well)
6 oz. (1 1/2 c.) powdered sugar
1/4 c. Merlot or similar (I used a blend of Merlot and ruby port)
2 TBS lemon juice

For the simple syrup:
1 c. granulated sugar
1 c. water
1 TBS Chambord liqeuer
1/3 c. coffee, cooled

For the icing:
6 oz. semisweet chocolate, chopped fine (I used a blend of 70%, 84%, and milk Lindt)
2 c. heavy whipping cream, divided
1 oz. semisweet chocolate (I used 70% Lindt), finely grated, for garnish

Method:

For the cake:
Preheat oven to 325°F (350°F for electric ovens). Spray 2 9″ cake tins with nonstick spray and dust with flour. Line cake tins with parchment paper and spray parchment paper with nonstick spray. Set aside.

Stir together almond flour, bread crumbs, all-purpose flour, chocolate, and baking powder until thoroughly combined. Set aside.

Beat egg whites (and cream of tartar, if using) in bowl of electric mixer fitted with whisk attachment on low speed until foamy, about 1 minute. Increase speed to high and beat until whites form soft peaks, about 1 – 2 minutes. Reduce speed to low and gradually add powdered sugar, about 30 seconds. Increase speed to high and beat until stiff, but not dry, peaks form, about 3 minutes.

Whisk wine and lemon juice into egg white mixture, being careful not to deflate whites.

Fold in 1/3 of the flour mixture until a few streaks of flour remain. Fold in half of remaining flour until a few streaks remain. Fold in remaining flour mixture until thoroughly combined.

Divide batter between pans and smooth tops. They will not smooth out during baking, so use a finger wetted with water to smooth them, if necessary.

Bake until cakes spring back when poked gently with a finger, about 20 minutes. Rotate pans around 12 minutes into baking. Start checking for doneness 16 minutes or so in; you do not want to overbake these cakes. If you poke with a finger and a dent remains in the top of the cake, they aren’t done yet.

When cakes are done, remove pans to wire rack and cool 10 minutes in pans. Release cakes onto wire racks and cool completely, about an hour to an hour and a half.

While cakes are cooling, make the simple syrup and chocolate mousse. Proceed as directed in “Assembly.”

For the simple syrup:
Boil sugar, water, and Chambord until sugar is completely dissolved. Stir in coffee. Cool completely.

For the icing:
Place chocolate in medium heatproof bowl. Heat 1/2 c. cream until boiling; pour over chocolate and allow to stand 2 minutes. Gently whisk together until completely blended. Allow to cool completely.

Beat remaining 1 1/2 c. cream until soft peaks form. Add all of chocolate mixture and whisk until completely blended; continue to whisk until stiff peaks form.

Assembly:
Slice each cake layer in half, for a total of four layers. Place four strips of wax paper on cake plate and place first layer, cut side up, on top of strips; you’ll pull these strips out after you’ve iced the cake.

Generously brush cake layer with simple syrup. You’ll use probably 2 – 3 TBS of syrup for this; it will seem like too much, but make sure cake layer is moist from the syrup. Spread about 2/3 c. of chocolate mousse onto cake layer and smooth. Place next cake layer, cut side up, on top of mousse; brush with syrup. Spread 2/3 c. mousse on top and repeat with third and fourth cake layers, ensuring that the fourth cake layer is placed cut side down. Ice top and sides of cake with remaining chocolate mousse. Carefully pull wax paper strips from beneath cake.

Decorate with grated chocolate. Keep refrigerated in an airtight container for up to 1 week.

Source: Cake barely adapted from America’s Test Kitchen Best-Ever Lost Recipes (January 2018), p. 84; icing from Chocolate Stampede Cake; simple syrup a KitchEnchantress Original. The original version of the cake can be found here.

Apple Crumble

AppleCrumble_12

I’m pretty crazed for apple pie, but pie crusts always defeat me. They turn out very tasty, for sure, but they always look… deformed. I’m being kind; really, I am. I just cannot seem to get pie crust to look pretty. And it is very important to me that my desserts look as pretty as I can make them. I usually don’t hit my goal posts in this regard, but I always keep trying. 🙂

AppleCrumble_1

This apple crumble recipe from Cook’s Illustrated piqued my interest. I thought I might be able to adapt this to something akin to a Dutch apple pie without the bottom crust. I ended up making quite a few changes to the original recipe. This turned out exactly as I’d hoped: a filling to rival that of the best apple pie, and a crumb topping that is both firm and tender, not to mention buttery!

AppleCrumble_10

I thought the baking times given by Cook’s Illustrated would yield some still-tough apples. I increased the baking time for the apples, baking them at 325°F for a while and then increasing the temperature to 350°F before finishing them at 375°F. The apples emerged soft, tender, juicy, and flavourful. To get the filling even more pie-like, I added some butter and brown sugar to the apples and increased the amount of cinnamon; I also added some cornstarch to get the filling to thicken. The finished filling tastes far better than the premade canned apple pie filling you buy at the store, and I’m proud to finally be able to say I created something that does this.

AppleCrumble_3

The crumb topping contains almonds. I was highly skeptical about including them, but I did so anyway, and I’m glad I did! I did change how the almonds were incorporated into the crumb topping by making sure they were completely ground up in the food processor, rather than leaving them in chunks as directed in the original recipe. The texture of the crumb topping is very rich, almost meaty, if you will, and I think this is due to the almonds. They impart a very faint nutty flavour to the crumb topping that gives the overall dessert more complexity and, oddly, makes it more satisfying. (This might also be due to the extra butter I added to the crumb topping. 😉 )

I thought this was unintentionally adorable and hilarious: One of my butterscotch rivulets formed a little heart on its own. I swear I didn’t engineer this; it just happened. Serendipity, I say: Just in time for Valentine’s Day. 🙂

AppleCrumble_15

Apple Crumble

Yield: One 8×8″ dish

Ingredients:

Filling:
1 generous TBS cornstarch
1 TBS + generous splash of lemon juice
generous sprinkle cinnamon (about 1 tsp.)
2/3 c. granulated sugar
pinch Kosher salt
6 Braeburn or similar apples (3 lbs. total), peeled and cut into 1/2″ cubes
about 2 tsp. light brown sugar
2 TBS unsalted butter, cut into about 12 – 16 pieces

Topping:
5 oz. (1 c.) all-purpose flour
1.75 oz. (1/4 c.) granulated sugar, plus 1 TBS for sprinkling on top
1.75 oz. (1/4 c.) light brown sugar
pinch Kosher salt
2 tsp. vanilla extract, optional (pretty sure I didn’t use any)
1/2 cup whole roasted, lightly salted almonds
1 stick unsalted butter, divided

Method:
Preheat oven to 325°F.

Topping:
Process flour, sugars, and salt. Add vanilla, if using, and pulse until combined. Add almonds and process until finely chopped. Add 6 TBS butter & process until butter is in pea-sized pieces. Turn mixture out onto baking sheet lined with Silpat or parchment paper and knead with heel of hand, as with puff pastry, until mixture clumps into large, crumbly balls. Spread mixture into even layer (there will be some small, sand-like bits along with mostly large crumbs about 1/2″ to 1″ in size). Set aside.

Filling:
Combine cornstarch, lemon juice, cinnamon, granulated sugar, and salt in large bowl. Stir to combine. Add apples and toss to coat; mixture will thicken. Pour into 8×8″ glass baking dish and smooth top. Sprinkle brown sugar over filling. Dot pieces of butter evenly across top of filling. Cover dish tightly with aluminum foil.

Bake both topping and filling at 325°F for 15 minutes. Remove crumb mixture (it should be lightly browned and firm; if not, bake for a few more minutes) and set aside on wire rack to cool completely. Increase heat to 350°; remove apples only briefly to stir, then bake them at 350°F for 15 minutes. Remove apples briefly to stir; increase heat to 375°F and bake apples for another 15 minutes. Remove aluminum foil and bake at 375°F, uncovered, for about 12 additional minutes, or until apples are starting to bubble in dish and are tender when poked with a fork.

Reduce oven heat to 350°F. Meanwhile, scatter crumb topping evenly over apples. Sprinkle 1 TBS white sugar over topping and bake about 20 minutes, or until tips of crumb topping (but not the entirety of each crumb) is golden brown and fruit is bubbling around edges. Cool 15 minutes on wire rack; serve with ice cream, whipped cream, and / or butterscotch (or caramel) sauce.

Source: Heavily adapted from Cook’s Illustrated (paid content)