I haven’t blogged in almost 4 years. The reason why is sad, and enraging, and terrifying; medical malpractise rendered me permanently disabled. I can’t and won’t go into details here, but suffice to say that after multiple hip, spinal, pelvic, and abdominal surgeries, and a lot of metal screws drilled into my lower spine, plus literally hundreds (possibly thousands; I stopped counting over 3 year ago) of hours of PT, I can now barely hobble around my kitchen. Sometimes. And only for a few minutes at a time.
For someone who used to walk 3 miles every day without fail, this is a very hard reality. I haven’t even touched the chronic pain that this has caused, or the living hell I and my husband have been through and continue to go through. And for those who took pleasure in my injuries for petty reasons – and you know who you are – well, shame on you. Seriously. What I have been through is indescribable and you should feel bad for delighting in my physical agony.
Well. So. On to French bread.
I had been meaning to try making my own French bread before the hospital got its merciless hands on me, but obviously that didn’t pan out. I decided that since I can now spend about 10 minutes at a time hobbling around, hunched over, that I might as well try making it and anyway, screwing up a recipe is a really tiny thing to happen in life compared to other things.
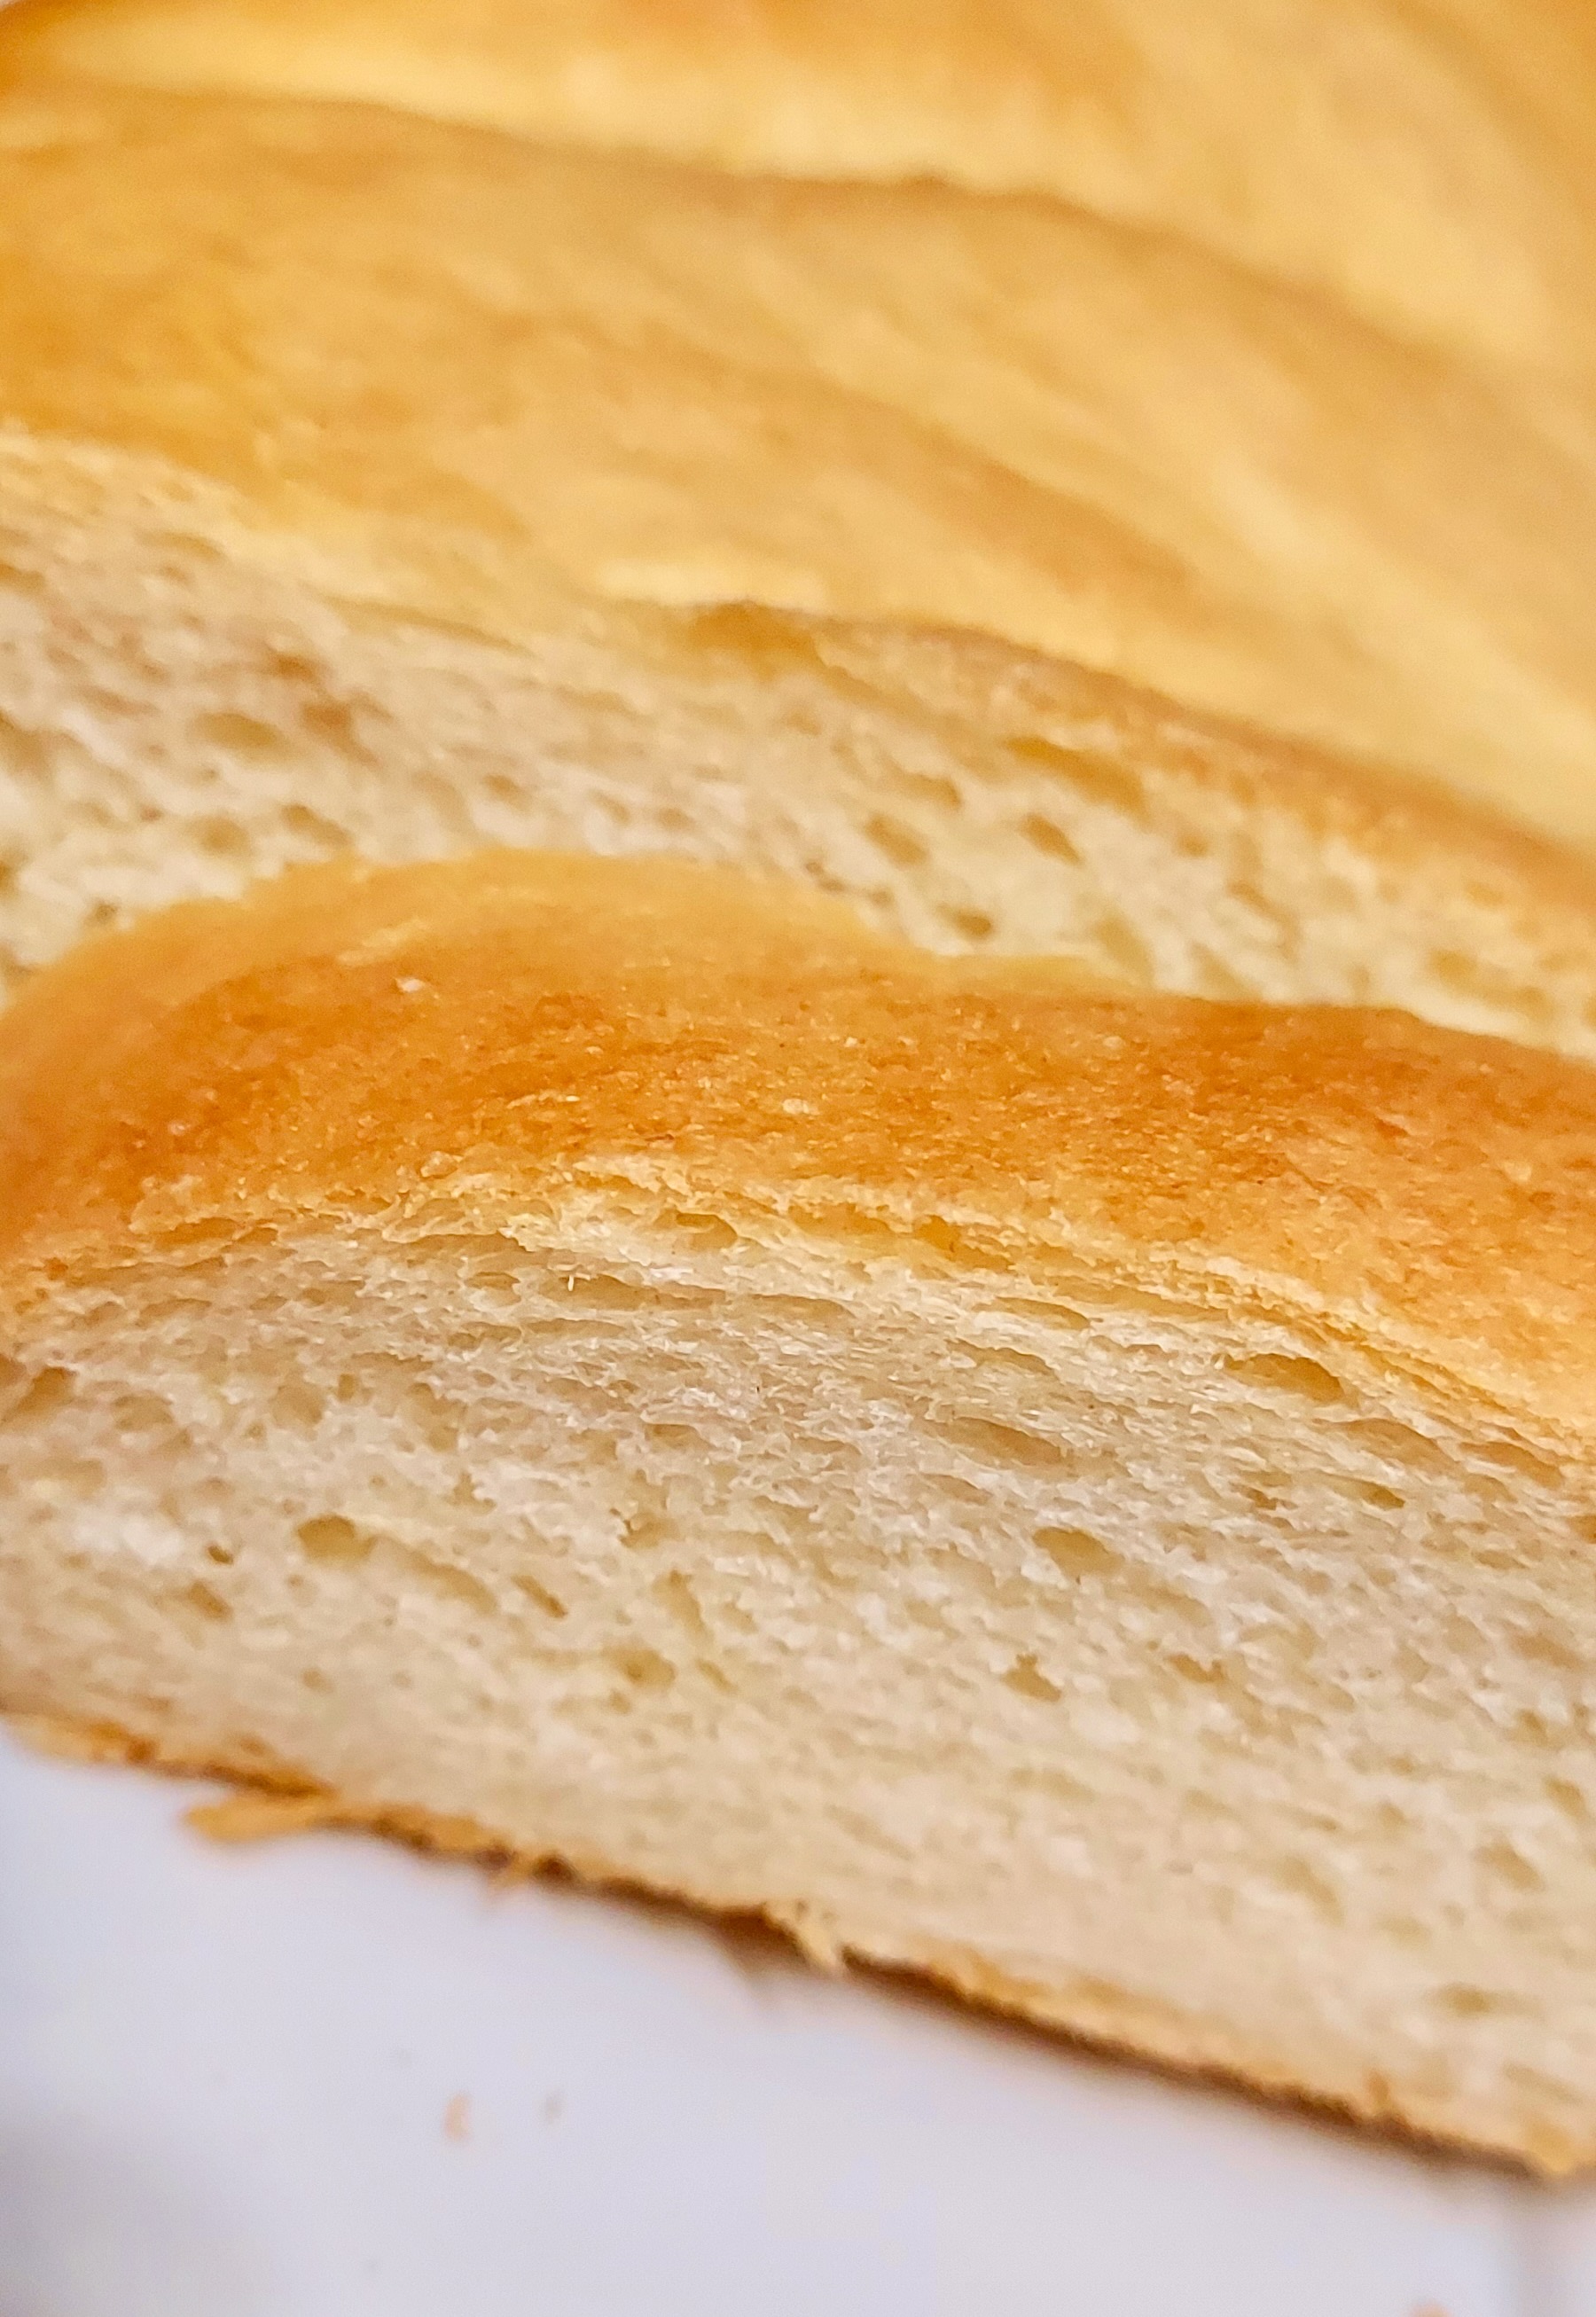
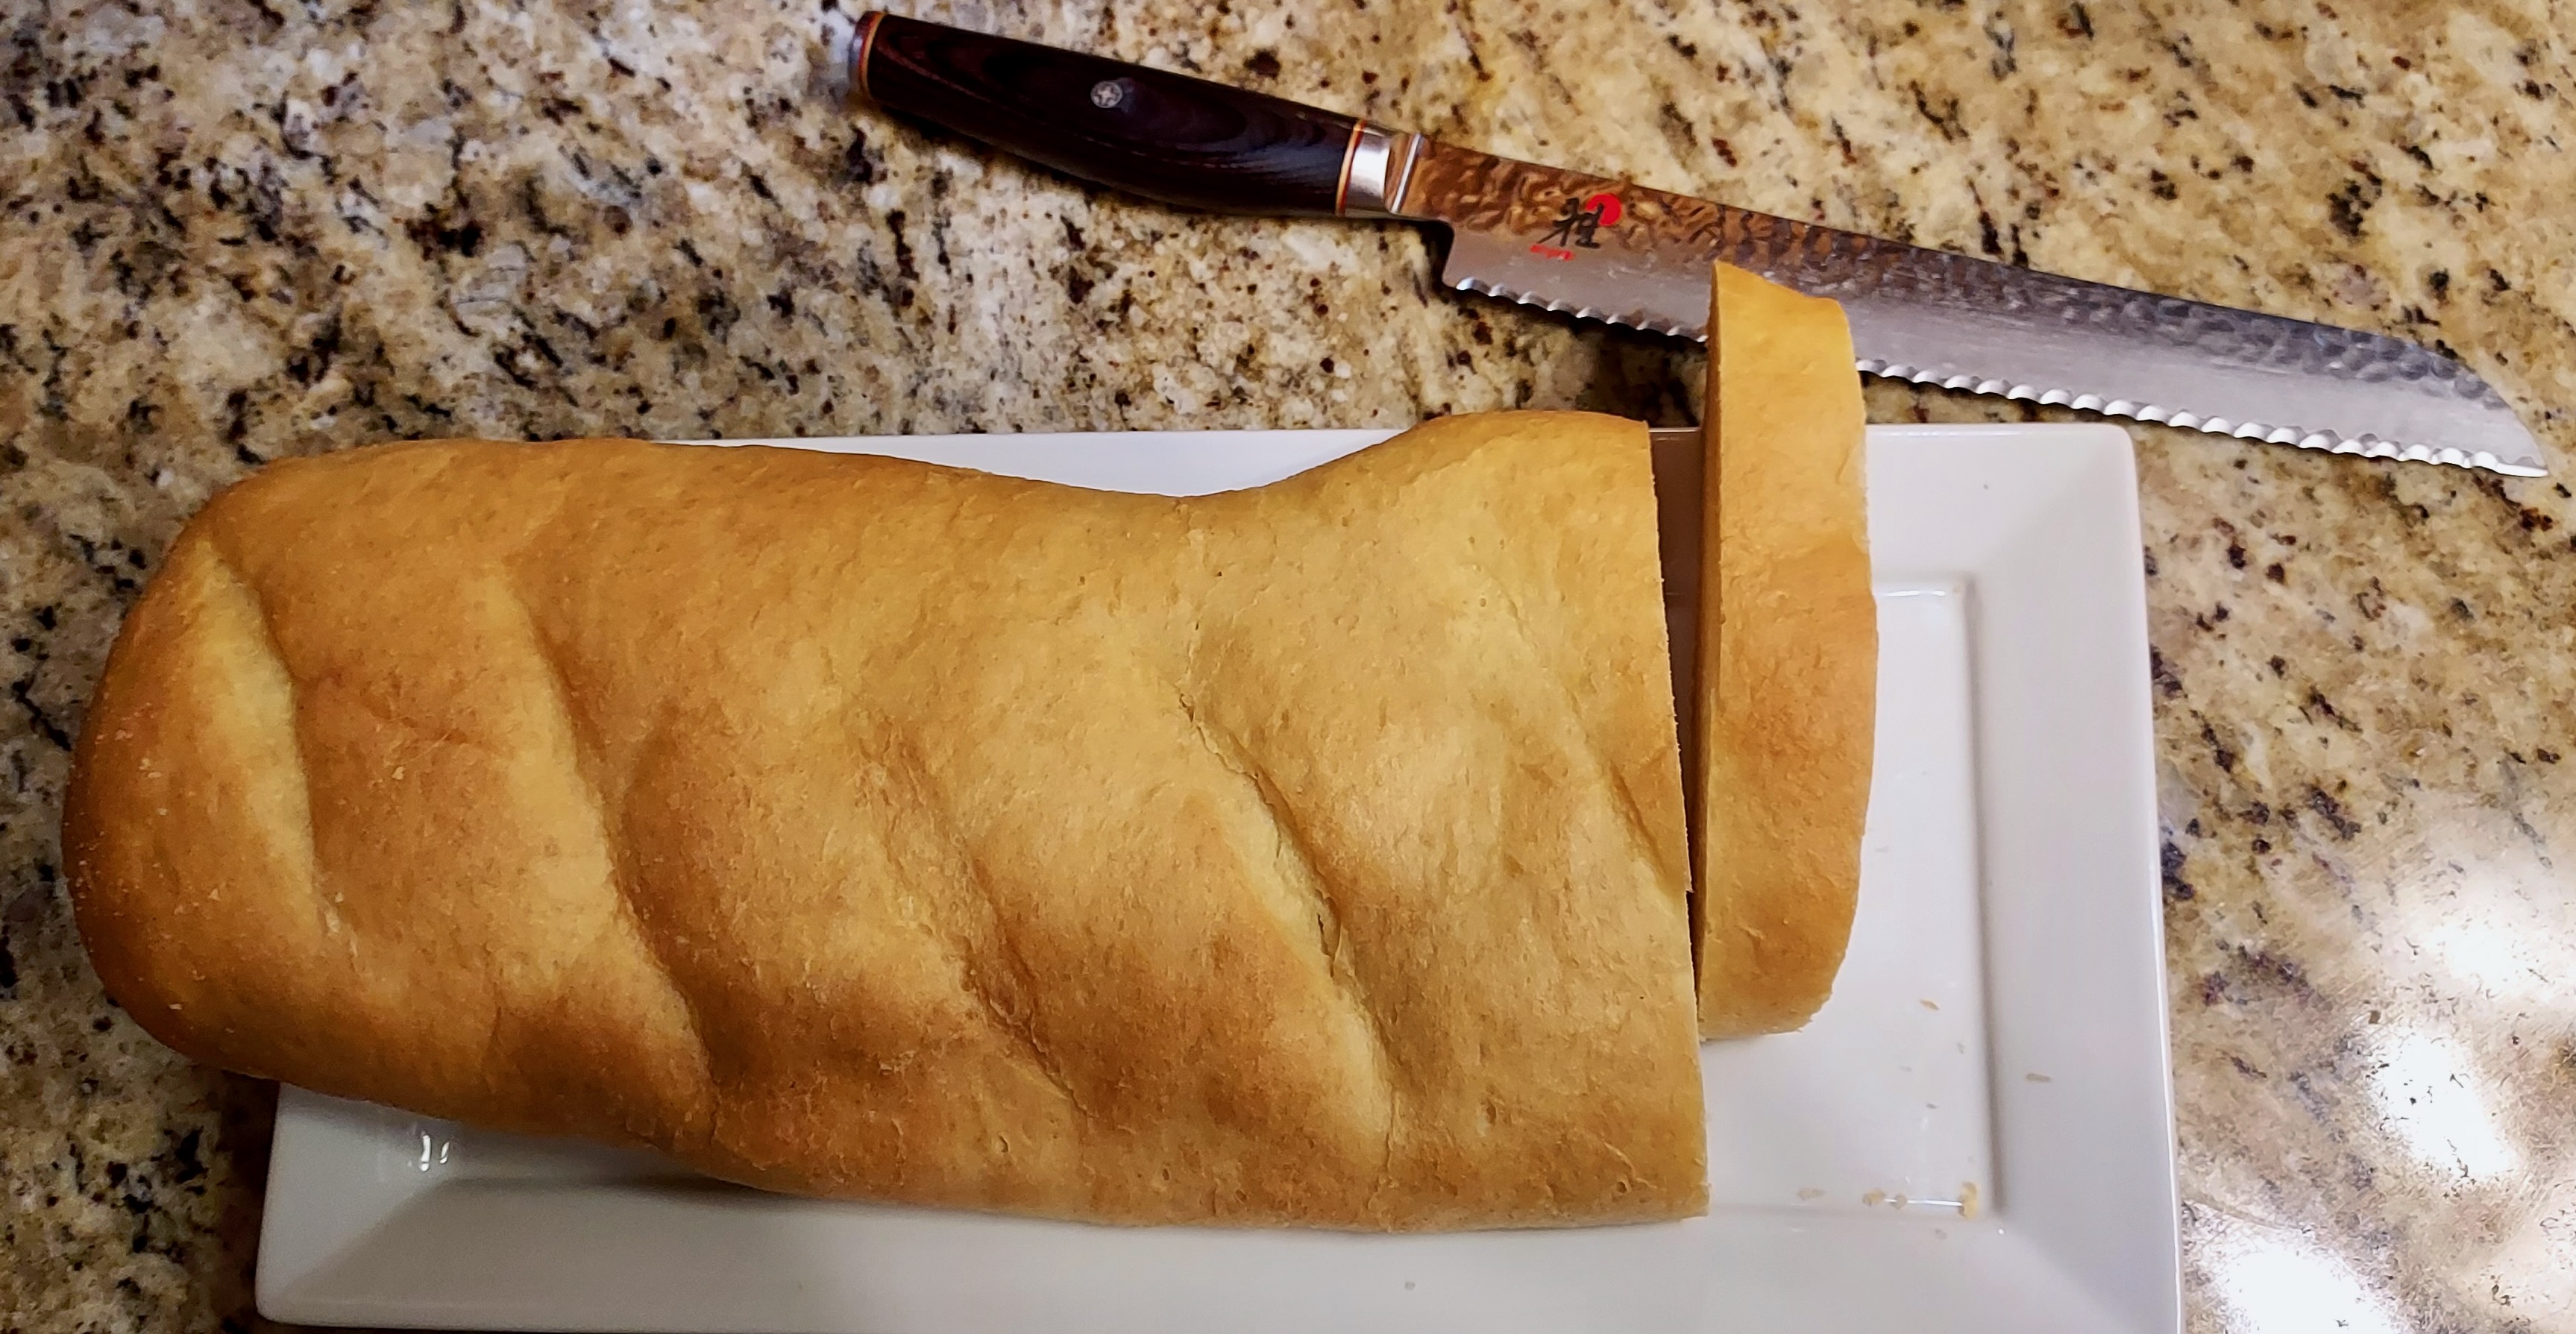
The finished texture and flavour are SO YUMMY! I was blown away that I made this myself, at home. I’ve almost never had bread this good from a bakery. The interior is as tender and fluffy as you’d like, with the ideal amount of chew; it is mildly sweet and yet perfectly neutral, and pairs equally well with sweet and savory accompaniments. The exterior is a gorgeous, crisp, golden brown crust with plenty of flavour in itself – I found myself longing for more of the crust; it is so chewy and buttery! Forget French bread from restaurants and bakeries; this beats them all hollow, as Pa Ingalls would say.
I made a few minor changes to the recipe as it was written. I added buttermilk where there was none before. I highly recommend you at least try substituting around 1/4 cup of the total water with buttermilk warmed to 110°F, because it adds a pleasant sweet tang to the flavour. (The water should also be warmed to 110°F. The big deal about 110°F is that yeast love hanging out at that temperature! Go much higher and they die; go much lower and they just kind of hibernate. Either scenario is bad because it means your bread won’t rise.) Instead of using just all-purpose flour, I replaced slightly more than 1/7 of the flour volume with bread flour. I believe the bread flour added a nice bit of chew to the tender bread; using just all-purpose would of course result in a more tender texture. The beauty of this recipe is that you can use whatever glutenous flour you like! Just do some research into the general kneading requirements and liquid:flour ratios that your intended flour tends to like, and you can make all whole wheat French bread, or any flour mixture you care to try. Keep in mind that different flours have different levels of moisture as well as different levels of moisture absorption, and that some butters have more water than others. These factors will heavily impact the amount of liquid you will need to add, should you deviate from the recipe as written.
Don’t be intimidated – TRY THIS BREAD! This recipe is lovely, it really is. It is completed in stages so there is no elaborate prep time, merely 10-15 minutes here and there where you do this stage, wait for an hour or so, then do the next stage. Total active prep time is around 30 minutes; the rest of your time is spent waiting for the dough to double in size or for the loaves to bake. Bake them separately; they’ll turn out better that way. Keep a close eye on the texture of the bread and if the correct texture is reached before the suggested kneading time, then stop kneading. Conversely, if the correct texture is yet to be reached, keep kneading. Add more flour or liquid (I’d recommend adding buttermilk instead of water) as needed, in 1-2 TBS increments, and only knead as much as is required to blend the new addition in. Kneading develops gluten, which gives bread its texture, but too little or too much gluten makes bread just not taste right. Too much gluten makes bread tough, to which I say RAWR! The correct texture that you seek for this recipe is one that is not so sticky that it keeps sticking to your hands if you touch it; is smooth and elastic, and tends to stay in one ball or mass instead of breaking off into smaller pieces; and tends to slide off the dough hook without leaving any residue behind.
Adding ice cubes to a tray and placing that tray on the bottom of the oven while each loaf bakes (use fresh ice for the second loaf, since the first cubes will be gone after the first loaf is done) gives the bread that classic browned, crisp texture and makes it look and taste as though you bought it from a bakery. The ice cubes are also optional, but they make a HUGE difference and I do not recommend skipping them. I recommend brushing the loaves with melted butter immediately after taking them out of the oven. It isn’t necessary, but it really does make the bread taste better, even hours or days later. This recipe yields 2 loaves, so you may experiment and try adding butter to one loaf but not the other and see what the difference is.
My photography for this recipe is lacking in quality and I apologise for that. I also forgot to photograph the stages in which the dough is rolled and shaped, and then slashed with a razor. The original recipe, linked at the bottom of this post, has photographs of these stages, if you would prefer a visual guide. I noticed that my rolled loaves were much longer than hers were, and my bread still turned out beautifully.
Yield: Two ~14″ loaves
INGREDIENTS:
2 ¼ c. warm water (110°F) OR 2 c. warm water & ¼ c. warm buttermilk (both at 110°F)
2 TBS sugar
1 TBS instant or active dry yeast*
1 TBS salt (either regular table salt or fine sea salt)
2 TBS olive oil (can also use canola oil, vegetable oil, or avocado oil)
min. 781 g. (max. 852 g.) all-purpose flour (I used ~650 g. all-purpose flour & then added bread flour up to 783 g.; added all-purpose during kneading stage if/when dough was too wet)
scant 1/4 c. warm (110°-115°F) buttermilk or water if dough is too dry**
~3 TBS olive oil for oiling bowl & countertop
8-10 ice cubes, optional (the steaming ice gives the bread its classic crisp crust)
2 TBS melted butter (either salted or unsalted), for brushing loaves right out of the oven (optional, but adds tremendously to the flavour of the finished bread)
*If using instant yeast, there is no need to proof the yeast. After mixing the water, sugar, & yeast, proceed directly to adding the rest of the ingredients. If using active yeast, allow the yeast to sit in the water with the sugar until it bubbles and foams, about 3-5 minutes; then proceed with the recipe as written.
**I used the buttermilk because my dough was a bit too dry, but I think I will substitute 1/4 cup of warm water for warm buttermilk next time; it gives the bread a certain tangy sweetness that is otherwise absent.
METHOD:
IF YOU DO NOT HAVE AN ELECTRIC MIXER: Mix with a spatula until dough thickens to the point that a spatula is ineffective; at this point, knead with your hands. This recipe is pretty forgiving. You will need to knead for roughly twice as long as the recipe states if you knead by hand.
In bowl of electric mixer fitted with dough hook attachment, combine water, sugar, and yeast. Use a spatula to make sure ingredients are well-mixed. (Even though I was using instant yeast, I allowed it to sit for several minutes as though it were active yeast; I believe this contributes to a lighter texture.) Add salt, 2 TBS olive oil, and approx. half of the flour. Mix with hook on med-low speed until flour is incorporated.
Add the remaining flour gradually. This is important! I added the remaining flour in one fell swoop and I believe this necessitated adding more liquid because some of the flour just didn’t get incorporated properly.
Once all flour is added, continue kneading on med-low speed for roughly 3 minutes. The key is to look at the dough’s texture. Once it has formed a smooth, elastic dough that is not sticky, stop kneading. If dough is too wet or too dry, add liquid or all-purpose flour as needed, around 1-2 TBS at a time, to get the right texture. Knead only as much as is necessary to incorporate these additions.
PROOFING:
Transfer dough to oiled bowl and gently move dough around so that dough ball itself is oiled; cover with either a clean towel or cling film. Allow to rise in a warm spot in the kitchen for around 1 hour, or until dough has doubled in size. Keep in mind that this recipe makes 2 loaves of bread, so you will need a large bowl to put the dough ball in!
Once dough has doubled in size, turn dough out onto flat oiled surface. Cut dough in half and pat each half into a 9×13″ rectangle. A rolling pin is not necessary; you can do this part with your hands. Rectangle does not have to have 90° corners, but it must approximate this shape and size as closely as possible. Roll dough into a log from the long edge, so that dough is shaped into a 13″ long log. Pinch bottom seams closed and ensure the seams are on the bottom; pinch in end seams and tuck them under as well.
Place each dough log onto a separate baking sheet lined with either parchment paper or a silicone baking mat. (You could technically fit both loaves onto a sheet, but they won’t bake as evenly and there will be less room for them to expand during baking.)
Use a razor blade or an EXTREMELY sharp kitchen knife to cut several diagonal slashes shallowly (1/16″ to 1/8″) into the top of each loaf. A sharp blade is important, because tearing the bread at this stage could result in its being retarded and unable to rise properly. For this reason, it is also best to cut the slashes now as opposed to just before baking; there is a higher chance of the bread’s deflating if slashed right before baking.
Cover each loaf with oiled cling film (or lightly brush each loaf with olive oil & then cover with cling film) and allow to rise until nearly doubled in size, approx. 1 hour or so.
BAKING:
Preheat oven to 375°F. (I baked my bread at 355°F, as my oven runs around 25°F too hot.) Make sure rack is in middle position. Bake one loaf at a time for 25-35 minutes on middle rack, or until bread is golden brown and sounds hollow when tapped. When putting in a loaf to bake, also put in 4-5 ice cubes onto a flat tray and place tray with ice cubes on the bottom oven rack. This is optional, but will give the crust that classic crisp texture. I kept the bottom tray in for the second loaf & just tossed the ice cubes into it right before closing the oven door.
Brush loaves with melted butter right when they come out of the oven. This is optional, but contributes greatly to the flavour and texture. Allow to cool and store at room temperature.
Loaves can be eaten warm from the oven with butter, cream cheese, you name it! French bread is beautifully versatile.
Notes on bread-making: Use the given amounts of flour and liquid as a guideline, and always start with the minimum given amount of an ingredient. Various factors can and will affect how bread turns out. Humidity is usually mentioned, but humidity has a negligible effect at best on doughs and pastries. What matters more is the moisture level of both the flour(s) and butter you are using, and the capability of the flour for absorbing moisture: Some flours are naturally ‘drier’ than others and so require more liquid. It is vitally important to look at the bread’s texture and add more flour or liquid as needed instead of simply using the amounts given robotically. Sometimes bread is really temperamental and you wind up adding more flour, then liquid, then more flour again, as I did here. It will still turn out all right so long as you do not over-knead or under-knead the bread. This recipe is fantastic because it can withstand a little too much kneading and still come out beautifully, with a crisp crust and a tender inside.
Try to ensure your extra/additional liquid, if adding on account of too-dry dough, is warm; yeast can also be temperamental and they prefer liquids that are around 110°F. The proofing process consists of the yeast eating sugars and carbohydrates like drunken sailors on shore leave, and then excreting the gases and alcohols created by their digestion. The alcohols created by the yeast bake off very quickly because the yeast just don’t create much alcohol. There are more than 1,500 different yeasts out there, all of which create different levels of excretion and different flavour profiles. When you finally put the bread in to bake, you are killing the yeast. They sense the rising temperature and increase, ever so briefly, their frenzied activities; then they die, literally exploding into steam. How cool is that?! (I suspect their exploded bodies are what make the zillions of tiny divots in bread. It would make sense, right?) Who knew bread-making could be so Gothic? 🙂
Notes on flour: The original recipe calls for all-purpose flour, not bread flour. I wanted a tender bread with a slight amount of chew, so I added a small amount of bread flour (a little more than 1/7 of the total amount of flour) and I am very pleased with the texture that resulted. Using just all-purpose flour will yield an even more tender bread. Use whatever flour you have on hand, but be aware you will need to adjust flour and liquid amounts, along with kneading times, because different flour types have different properties (as discussed in the first paragraph under the heading “Notes on bread-making”). You will still achieve a beautiful bread! Just be sure to do a little reading about the type of flour you intend to use so that you know the right, or general, kneading times, absorption rates, dryness, and liquid:flour ratios beforehand. Even if you don’t find the exact information you are looking for, give it a go anyhow. People have been making bread for thousands of years. You can do this!!!
SOURCE: Adapted from Mel’s Kitchen Cafe